How to Thread an Industrial Sewing Machine: Step-by-Step With Photos
How to Thread an Industrial Sewing Machine: Step-by-Step With Photos
Threading is the most-skipped step in sewing and the most common cause of the complaints operators bring to a supervisor. A thread that never entered the take-up lever behaves exactly like a broken tension setting: loops underneath, bird’s nests at the start of a seam, and a dial that gets turned every ten minutes without ever fixing anything.
This is the full sequence for a single-needle industrial lockstitch — the machines that run most of a garment floor — with the bobbin side done properly, and the five mistakes that account for most threading stoppages.
Presser foot up, take-up lever at the top, thread stand behind the head. Every step below starts from this state.
What Do You Need Before You Start?
- The right needle — correct system, correct size, sharp. Change it now if it has more than a shift on it.
- The right thread — and the right bobbin thread to match it.
- The correct bobbin and case for this machine — industrial lockstitch uses L style (20.3 × 8.9 mm) or M style (24.9 × 10.7 mm) bobbins. A class 15 bobbin is a domestic size; it will sometimes seat and then damage the hook.
- Power off before you fit a needle or put a hand near the hook. The manual repeats this warning before every adjustment, and it is not boilerplate.
Which Way Does the Needle Go In?
Before threading, check the needle. The manual is specific:
- Turn the handwheel until the needle bar is at the highest point of its stroke.
- Power off.
- Loosen the clamp screw and hold the needle with its indented part (the scarf) facing exactly to the right.
- Insert the needle fully into the hole in the needle bar, until it reaches the end of the hole.
- Tighten the screw.
- Check that the long groove faces exactly to the left.
Scarf right, long groove left, shank fully up in the clamp. If the scarf is rotated, the loop becomes unstable and the thread breaks or hangs.
One caution worth knowing if you run polyester filament: if the indented part is tilted toward the operator’s side, the loop of thread becomes unstable and you get thready hangnails and breakage. For threads where that happens, the manual’s fix is to fit the needle with the indented part slanting slightly to the rear.
What Is the Correct Order for the Upper Thread?
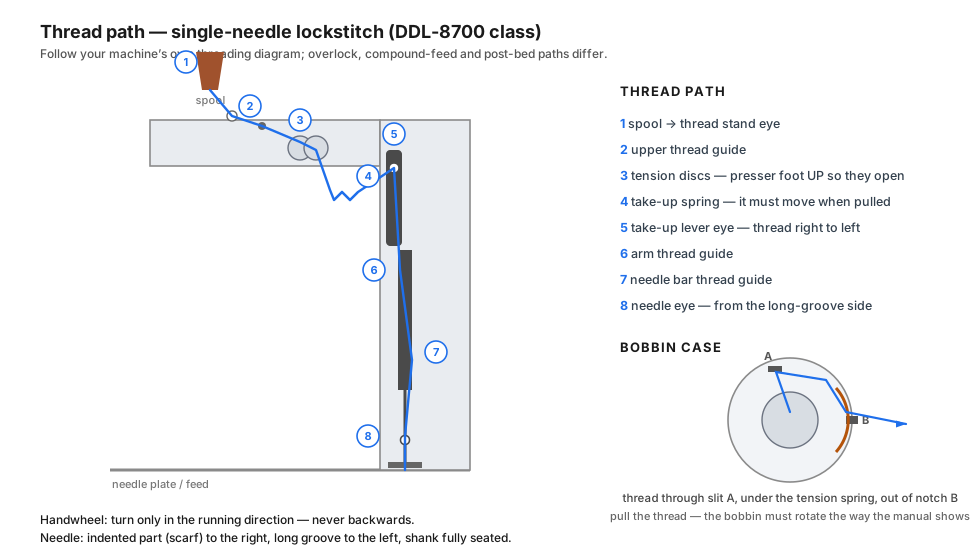
The thread path is printed in the machine’s own threading diagram for a reason: it differs by model. On a DDL-8700-class head the sequence is:
- Spool on the thread stand, behind and above the machine, thread taken from the stand’s guide eye.
- Upper thread guide at the top of the machine.
- Guide post / pre-tension on the top of the arm.
- Between the tension discs — with the presser foot raised, so the discs are open. Seat the thread down between them; it must not lie over the top of the disc. Use the knee lifter to open them if you need the room.
- Under the take-up spring — the spring must move when you pull the thread. If it does not, the thread is not in it.
- Through the take-up lever eye, right to left, with the lever at its highest point.
- Down through the guides on the arm and the needle bar thread guide.
- Through the needle eye, from the long-groove side to the scarf side. On a DDL-8700 that is left to right. Leave about 10 cm of tail.
Step 4 — foot up, discs open, thread down between them. This is the step most often done with the foot down, which is why the thread ends up lying on top of the discs.
Step 6 — the take-up lever. Miss it and no amount of dial adjustment will ever balance the stitch.
Step 8 — thread from the groove side to the scarf side. The thread must run in the long groove.
The full path, numbered: spool and stand eye → top guide → guide post → tension discs → take-up spring → take-up lever → arm guides → needle bar guide → needle eye.
How Do You Wind a Bobbin That Feeds Evenly?
An unevenly wound bobbin is a tension problem that no dial can fix, because the thread comes off in jerks.
- Push the empty bobbin fully onto the winder spindle.
- Take the thread from the spool on the right side of the thread stand and pass it through the winder guides as shown in your machine’s figure.
- Wind the end clockwise around the bobbin several times by hand.
- Press the bobbin winder trip latch and start the machine; the bobbin winds and the spindle stops automatically when it is full.
- Remove the bobbin and cut the thread with the thread cut retainer.
Winding: thread taut from the start, wound clockwise, winder stops itself.
Two things the manual calls out that operators skip:
- Start winding with the thread taut between the bobbin and the winder tension disc.
- If you wind a bobbin while the machine is not sewing, take the needle thread out of the take-up lever path and take the bobbin out of the hook first.
If the thread piles up at the top or bottom of the bobbin instead of winding evenly, the standard is that the centre of the bobbin sits level with the centre of the winder tension disc; the adjustment moves the winding up or down from there.
How Do You Set the Bobbin Into the Case?
Slit → under the spring → out of the notch. Then check the direction of rotation.
The manual’s sequence:
- Pass the thread through thread slit A.
- Pull the thread in the direction shown — it passes under the tension spring and comes out of notch B.
- Check that the bobbin rotates in the direction of the arrow when the thread is pulled. If it turns the wrong way, it is in the case backwards.
- Seat the case on the hook until it latches, and leave about 10 cm of tail.
If you have a gauge, the case tension is worth knowing rather than guessing: 200–300 mN, about 20–31 gf — the force needed to pull the thread out of a case held by its own thread.
How Do You Bring the Bobbin Thread Up?
- Hold the upper thread tail taut in one hand.
- Turn the handwheel only in the running direction — toward you — until the needle goes down and comes back up to the top.
- The bobbin thread comes up as a loop through the needle plate hole. Draw it out with tweezers or a seam ripper.
- Take both threads, pass them between the toes of the presser foot and to the back of the machine, and leave 10–15 cm of tail behind.
Both tails to the back. Tails at the front end up sewn into the first centimetre of the seam.
Two habits from the same step:
- Never turn the handwheel backwards. Turning it against the running direction is how thread gets wound into the hook and a five-second fix becomes a strip-down.
- Take-up lever and needle bar at the top before you pull the fabric out. If either is not fully up, the thread binds on the hook when you pull the work away.
What Does a Correctly Threaded Machine Look Like?
Four checks, thirty seconds, before you run production:
- Pull test — with the foot down, the upper thread should pull with firm, even resistance. Free and easy means it is not between the discs.
- Take-up spring — it must move when you pull the thread.
- Tail position — both tails behind the presser foot, never in front.
- Stitch test — 20 cm on the actual fabric. On a 301 lockstitch the knot is buried inside the fabric: a small even dot at each needle penetration, no loop above or below.
If the test shows loops, do not start turning the dial — go and re-thread first. If it still loops after that, the bobbin case is the next place to look, and the gauge number to aim at is 200–300 mN (20–31 gf).
Which Five Threading Mistakes Cause the Most Stoppages?
|
Mistake |
What it looks like |
Fix |
|
Threaded with the presser foot down |
Bird’s nest under the fabric; no upper tension at all |
Re-thread with the foot up, so the discs are open |
|
Take-up lever missed |
Slack loops, uneven stitch, thread shredding |
Re-thread step 6; the spring must move |
|
Needle in the wrong way round, or threaded from the wrong side |
Shredding, hangnails, skipped stitches |
Scarf right, groove left, thread from the groove side |
|
Bobbin backwards in the case, or the wrong bobbin size |
Loops on top of the fabric, uneven feed |
Follow slit → spring → notch; check rotation; L or M style, not class 15 |
|
Fabric pulled away with the take-up lever down, or handwheel turned backwards |
Thread wound into the hook, jammed head |
Lever and needle bar at the top before removal; handwheel in the running direction only |
The result you are aiming for: knot buried in the fabric, no loops above or below.
What About Overlock and Compound-Feed Machines?
The same four rules hold — discs open when you thread, thread in the take-up, needle threaded from the groove side, bobbin or looper thread under its tension spring — but the path itself is machine-specific, and on an overlock you are threading loopers as well as needles.
Three things that change:
- Overlock adds looper threads and a different threading order; the needle system is DC×27, not DB×1.
- Compound-feed and walking-foot machines have a longer needle-bar travel and their own guide layout; the needle system is 135×17 / DP×17.
- Post-bed and cylinder-bed heads put the thread path in a different plane entirely.
Follow the threading diagram on the machine, or in its manual, before you follow any article — including this one.
Where DOIT Fits
Threading discipline is built into the machine you buy:
- DT C10-D4 — 550 W servo, 0–5,000 spm, DB×1 #7–22, with automatic thread trimmer, backtack, needle positioning and presser-foot lift. Programmed backtack with a fixed stitch count takes the loose-start problem out of the operator’s hands, and the needle-positioning function stops the machine with the take-up lever where the operator needs it.
- DT H10-D4 — compound feed, DB×1 #11–18, for heavy cross-sections.
- DT 940-4AT and DT 5114EXT — four-thread overlock, DC×27 #9.
Every machine ships as a complete machine — head, table, stand, motor, thread stand and oil pan — because a head without a thread stand cannot be threaded correctly on day one. Send us the model and the thread you run, and we will send back the threading diagram and the needle and bobbin spec for that head.
📩 Email: sales6@chinadoit.cn
🌐 Website: doitsewingmachine.com
Sewing Table Size: Top, Height, Cutout and Floor Space